MAST STEP RE-FIT
By Dan Pfeiffer and Graham Bryan
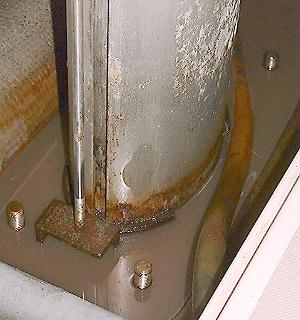 The OEM mast step on the 10M is made of steel. It sits in the bottom of the bilge and is in direct contact with the aluminum mast. Add a little salt water to the bilge and you have a perfect environment for galvanic corrosion where the less noble metal (the aluminum mast) will start giving up material. There are several ways to address this corrosion problem. This article will discuss three of them. This problem is seen in other Pearsons (see crossover sidebar). The 323 and 365 have the same step. See the web site for more photos and details on the repair methods.
SOLUTION #1
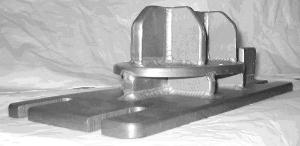
Metalmast Marine provides a solution by custom fabrication of a new anodized aluminum riser/step. You cut the corroded portion off the bottom of your mast and send it to them with the steel mast step. They fabricate a riser to match the height of your cut off portion. At the top there is a plate for the mast to sit on with a flange that fits snuggly inside. The base is a plate that matches the foot print of the OEM step for a bolt in replacement. Because the new riser/step is aluminum like the mast there is no galvanic corrosion between them. The base of the riser/step still sits in the bilge and is still secured to the stainless (or bronze) keel bolts so there is a corrosion potential there. But it's the riser/step that will corrode, not the mast or the keel bolts. The riser step is a lot cheaper and easier to replace than the mast. The cost is in the 300-$400 range. Lifetime may be 10 years.
More... Click here for more photos of the Metalmast rider step as made for a Pearson 365.
 Metalmast Marine
55 Providence Street
PO Box 471
Putnam CT 06260
Phone 860-928-2776
Fax 860-928-7312
metalmast.marine@snet.net
http://sailingsource.com/metalmast/
SOLUTION #2
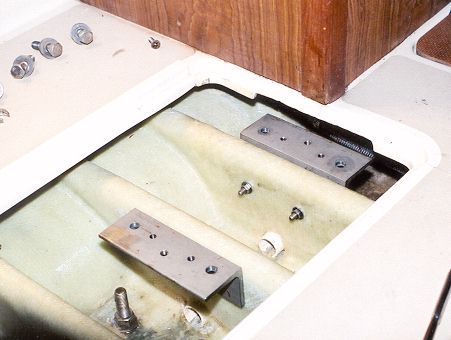
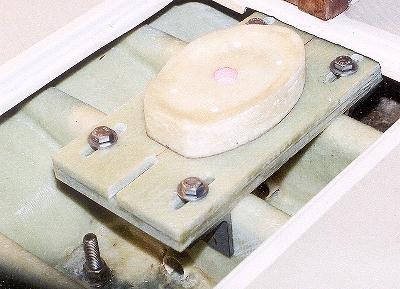 Another solution (used on #212) is a new fiberglass mast step supported up out of the bilge on fiberglass floors (transverse beams). The new step sits about six inches higher than the OEM. To maintain the proper rig geometry six inches is cut off the mast, including the corroded portion. A portion of the cabin sole had to be cut out to provide access to the bilge for the floor fabrication. The cut out portion was fastened back in place. The glass for the floors was laid-up with epoxy over foam forms cut to fit in the bilge at the right height for the step to sit on. One OEM floor was replaced to provide more area for epoxy bonding of the new floors. By building the floors in place the entire structure is made with primary bonds (see bonding sidebar). The mast step is made of two 7 x 14 x 1/2" thick fiberglass plates laminated from layers of biaxial glass with mat. The lay-up was done in a jig/press made from 3/4" plywood. Care must be taken to keep this thick lay-up from overheating while it cures (read and understand the epoxy literature). The top plate is slotted to slide for and aft on the bottom. 1/2" bolts hold it down. They go through the bottom plate into threaded holes in a stainless steel angle bracket that is bolted to the new floors. The slots and holes were made on a milling machine.
This solution has advantages over the Metalmast step replacement. There is no metal-to-metal contact to cause galvanic corrosion, the base of the mast is raised out of the wet bilge, and the new floors add stiffness to the bilge/keel area of the boat. It is more expensive then the Metalmast solution, takes more time and requires cutting a section from the cabin sole but is a lasting solution to the corrosion problem. A similar step refit was made to Jade (#187)
More... Click here for more detailed description of this mast step re-fit with more photos.
SOLUTION #3
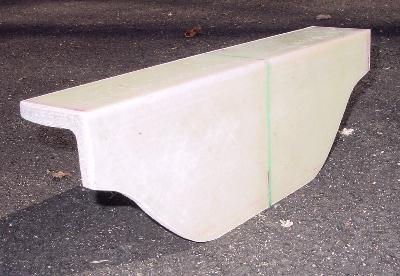 The owner of Jade (#187) also owns Hornpipe (#38) and has refined the process of that used in #212 to reduce labor time and costs with little or no loss of functionality. Fiberglass floors are fabricated off the boat. The floors are an inverted L-shape (with flange at the top as in the J/35) eliminating the stainless steel angle brackets used in #212. The fiberglass mast step plate bolts directly to the flange. The floors are tabbed into the bilge with biaxial tape and biax/mat in the same manner as in #212.
For installation the old steel step is unbolted from the keel bolts and discarded. The keel bolt nuts and washers are re-fastened. The cabin sole is leveled in both fore/aft and port/starboard directions by adjusting jack stands. A simple jig holds the two new floors properly positioned by a stop that contacts the front end of cutout in the cabin sole to set the fore/aft position. The new floors will need some trimming to fit the bilge profile, while still mounted to the jig plate. The jig plate must also end up level in both directions while fitting closely in bilge. The floors are fastened into the bilge with thickened epoxy. Once the epoxy has cured the jig plate is removed and the floors are tabbed in place with biaxial fiberglass tape and epoxy resin. The step plate with mast plug or socket is mounted to the floors and the step is ready for the mast. Before re-stepping a section of the mast corresponding to the change in height of the new step (over the old one) may be cut off or, rig could be raised 4-5 inches using toggles etc.
This method uses two additional floors and thus improves keel to hull rigidity over the factory design (see note) almost as much as the floors in #212 but has the advantage of not having to remove a portion of the cabin sole to install. The mast plate attachment is simpler, and eliminates the two angle brackets used in #212. Graham will be able to supply a complete kit for this much improved mast step. Kit contains four main fiberglass components: Two solid fiberglass floors, a fiberglass step plate, and a plug that fits snugly inside the mast, which is bolted to the step plate.
Note: There is nothing inherently wrong with the keel to hull rigidity in the 10M as it came from the factory. Adding new floors to support the mast has the added effect of increasing keel to hull rigidity but that is not the purpose of the design nor is it a necessary modification.